How to make a tattoo stencil
Updated November 15, 2026
A tattoo stencil is a purple or black line transfer of your design that you press onto clean skin, so you have a guide to tattoo over. Every method has the same two parts: get clean line art of the design at the right size, then transfer those lines onto stencil paper. Which method fits depends on what equipment you have.
Which method should you use?
| Method | You need | Good for |
|---|---|---|
| 1. Hand trace | Hectograph (carbon) stencil paper, a ballpoint pen | Getting started, small simple designs, no printer |
| 2. Thermal copier | Regular printer + thermal copier + thermal stencil paper | The classic shop setup; reliable for most work |
| 3. Thermal stencil printer | A thermal stencil printer (Brother PocketJet / S8, Phomemo and similar) + thermal paper | Printing straight from a computer, phone or tablet |
| 4. Inkjet + stencil ink | Inkjet printer with stencil ink + tracing / stencil paper | Very fine lines and detailed realism |
Methods 2 to 4 all start from a digital file, so the first step is the same: turn your design into clean line art.
Step 1: Get clean line art
A stencil needs clear outlines and, if you shade, a few marks for where the shadows go, not every texture of the original. Fewer, cleaner lines transfer better and smudge less on skin.
- Draw it yourself. If the design is already your line drawing, you're done. Scan or photograph it flat, straight on, in good light.
- Trace it on a tablet. In Procreate or a similar app, put your reference on the bottom layer, lower its opacity, add a new layer on top and trace with a clean, even brush. Hide the reference and export the line layer. This gives the most control but takes the longest, often 20 minutes to an hour for a detailed piece.
- Use a stencil maker. Tools like LineStencil turn your design or a client's photo into line art in about 15 seconds. Then check it against the original and touch up anything that changed. The step-by-step version is in how to make a tattoo stencil from a photo.
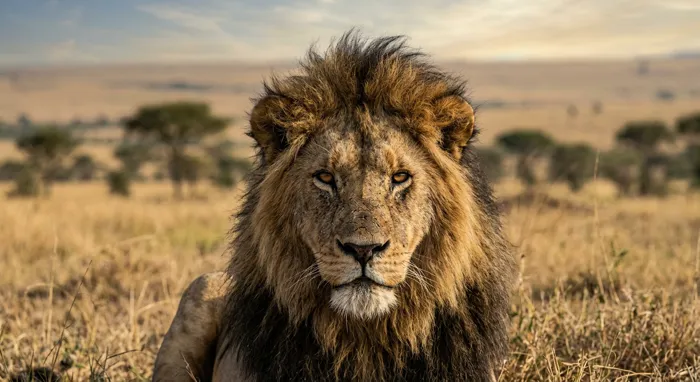
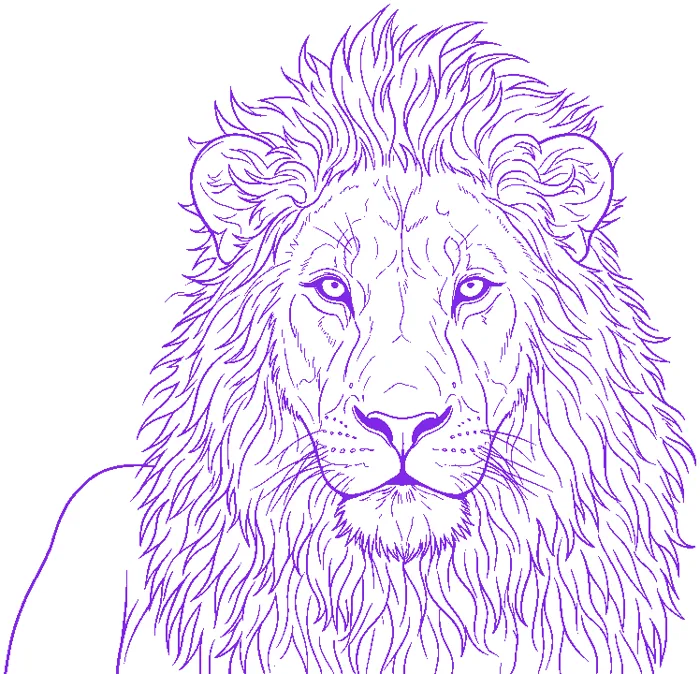
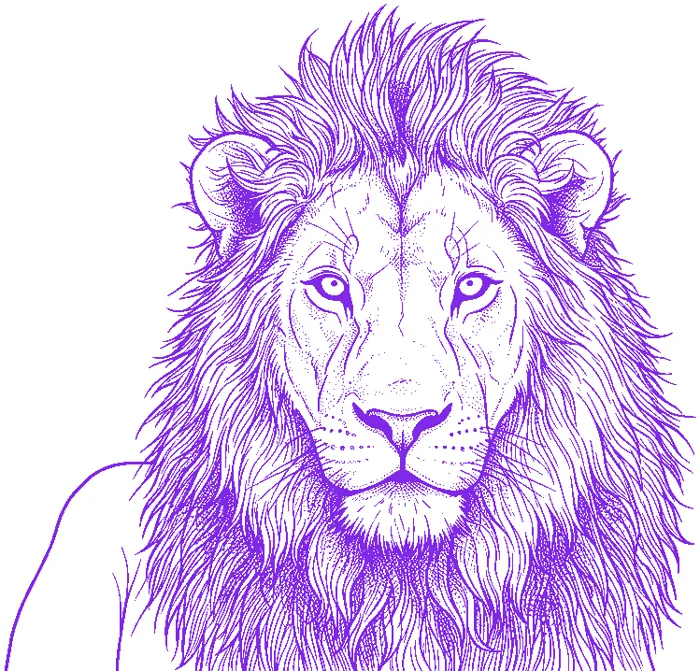
Outline only works for lettering, traditional and fine-line designs. Hatch marks help when you'll shade a portrait or animal.
Only make stencils from images you have the right to use: your own design, your client's photo with their permission, or artwork you've licensed.
Step 2: Set the size
Measure the spot on the body, then size the design itself, not the image around it: blank margins make the printed design smaller than you expect. Print at 100% / "Actual size", and check the result with a ruler. Large pieces like sleeves and back pieces won't fit on one sheet; split them across pages with overlap and alignment marks. Details are in how to print a tattoo stencil at exact size.
Method 1: Trace by hand with stencil paper
Hectograph stencil paper has four layers: a white top sheet, a thin tissue sheet, a purple carbon sheet and a backing sheet.
- Remove the thin tissue layer so the carbon faces the back of the white sheet.
- Place your design on top of the white sheet (or draw directly on it).
- Trace every line with firm, steady pressure using a ballpoint pen. The carbon copies your lines onto the back of the white sheet.
- Peel off the white sheet. The purple lines on its back are your stencil, already reversed so the design reads correctly on skin.
It's cheap and needs no machine, but slow for detailed work, and uneven pressure gives faint lines.
Method 2: Print, then run it through a thermal copier
This is what most shops do: print the line art on plain paper at the right size, then feed it through a thermal copier with thermal stencil paper.
- Print the line art in black at 100% scale on regular paper.
- Put your printout into the thermal stencil paper the way the paper's instructions show. Brands stack their layers differently, so check yours once.
- Feed it through the copier. The heat transfers the lines onto the white sheet.
Thermal copiers react to carbon, so laser prints and photocopies copy most reliably; some inkjet prints come out faint. If yours does, photocopy the print first or test one sheet. Raise or lower the copier's darkness setting if the lines are too heavy or too light.
Method 3: Print straight to a thermal stencil printer
A thermal stencil printer skips the paper printout: it prints your file directly onto thermal stencil paper.
- If the printer shows up in your computer's normal print dialog, print like any document: pick the printer, scale 100%, the right paper size.
- Many small Bluetooth printers only print from their own phone app. Export a high-resolution PNG (300 DPI) and open it in that app, then set the width again and check it with a ruler: some apps fit the image to the paper.
- Print in black. Thermal printers read dark pixels, and purple or grey lines can come out broken.
Method 4: Inkjet printer with stencil ink
Some artists fill an inkjet printer (often an Epson EcoTank) with stencil ink and print onto tracing or inkjet stencil paper. It gives the finest, most durable lines, but the setup costs more and the print head can clog if you don't print regularly.
- Mirror the design before printing. The ink side goes against the skin, so the image flips. Text and lettering will read backwards if you don't.
- Let the ink dry fully before handling the sheet.
Apply the stencil to skin
- Shave the area and clean it with green soap or rubbing alcohol. Let it dry.
- Apply a thin layer of stencil transfer solution and wait until it's tacky, not wet.
- Press the stencil on, smooth it from the center out without sliding, then peel it off in one motion.
- Let the stencil dry, usually 10 to 20 minutes, before you start. A dry stencil lasts much longer under wiping.
On curved areas such as shoulders, knees and ribs, a flat stencil can wrinkle or distort. Cut the stencil into sections and apply them one at a time, or draw that part freehand with a skin marker.
Common problems
- Stencil is faint or patchy: heavier pressure when hand tracing; darker setting on the copier or printer; black lines instead of grey.
- Lines smudge into a blur: too much detail or too much transfer solution. Simplify the line art and use a thinner layer.
- Wrong size: the print was scaled. Print at 100% and size the design, not the image with margins.
- Lettering reads backwards: mirror it for inkjet-on-tracing-paper; don't mirror for hand tracing or thermal copiers and printers.
- Stencil wipes off mid-session: it wasn't dry. Give it longer before you start.
FAQ
Can I make a tattoo stencil without a printer?
Yes. Trace by hand on hectograph stencil paper (method 1), or draw directly on the white sheet. A printer only becomes worth it when you make stencils every week.
Can I use regular printer paper as a stencil?
Not directly: plain printer ink doesn't transfer to skin. Use the printout as the original for a thermal copier, or as a guide to trace by hand.
Do I need to mirror my design?
For hand-traced and thermal stencils, no: the transfer already reverses it. For inkjet stencil ink printed onto tracing paper, yes.
Is there a free way to make the line art?
Tracing by hand or on a tablet is free but slow. LineStencil gives you one stencil a day free without an account, so you can try a stencil maker on your own design before paying for anything.